

Business website owners know how important it is to maintain consistent and positive communication. Updating the content of your site is important, but that’s seldom enough to get the job done. In order to build relationships with current or potential clients, and convey more personalized (and conversion-generating) information, it’s a good idea to roll out an email marketing campaign.
MailChimp is an email marketing service that enables you to build subscriber lists, create campaigns, and more. It can also be used with WordPress seamlessly, further streamlining your email marketing campaigns.
In this post, we’ll introduce MailChimp and its various benefits. We’ll then show you how to install the MailChimp for WordPress plugin, and how to use it’s many signup form options on your site. Let’s get started!
Why MailChimp?
There are many email marketing services available, including AWeber, ConstantContact, and GetResponse. So, why is MailChimp the ideal choice for WordPress users?
Its many features – such as automation, A/B testing, advanced analytics, and segmentation – make it possible to easily manage effective email campaigns. The MailChimp interface is extremely user friendly, letting you easily build gorgeous emails to update your subscribers. What’s more, MailChimp offers 24/7 customer support.
How To Install the MailChimp WordPress Plugin.
While it’s possible to use MailChimp on your WordPress website without a plugin, the MailChimp for WordPress plugin streamlines the process:

Once installed and activated on your website, head to the MailChimp Settings option within WordPress. Here, you can connect your MailChimp account (using an API key) and gain access to your lists and forms.
Finding & Generating an API Key
In a nutshell, an API key connects your site to another service (in this case, MailChimp). To find your API Key, go to MailChimp for WP > MailChimp within WordPress. Below the API Key field, click Get your API key here:

From here, you’ll be redirected to the MailChimp website. Click Create A Key, then copy the one provided. Return to the WordPress website, paste it into the API Key field, and hit Save Changes.
You now have access to your Lists, previously created Forms, and any Integrations. You also have the ability to create new Forms by navigating to MailChimp for WP > Form:
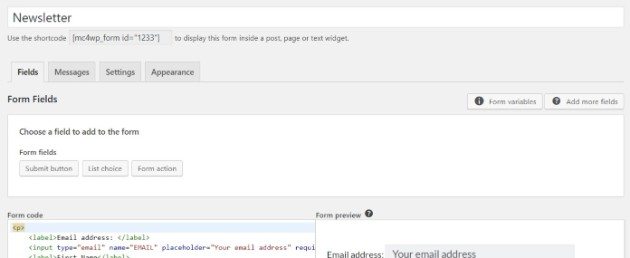
Once created, you can add the form to your pages, posts, or widgets using the shortcode provided.
Adding a MailChimp Signup to WordPress
If you’ve installed the MailChimp plugin on your website, creating and adding signup forms is simple. However, you can also do it manually from the MailChimp website.
Adding a Signup Popup
To add a popup signup form to your website, navigate to Lists > Signup forms > Subscriber pop-up within MailChimp.
Next, customize the popup by choosing a Design (including format and display options), the Fields you’d like to include (such as name and email address), and an other Content (such as a background image). You can also preview the popup as you customize, and make any necessary tweaks throughout the process.
Finally, click Generate Code at the bottom of the pop-up form editor, highlight the code, then copy it:
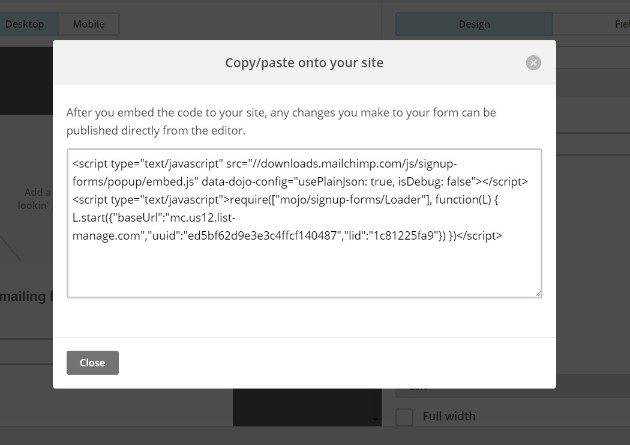
Now, head over to your WordPress dashboard. You’ll need to add the code to your website’s HTML, which we recommend doing with a child theme in place. This preserves any changes from being wiped out when your theme is updated.
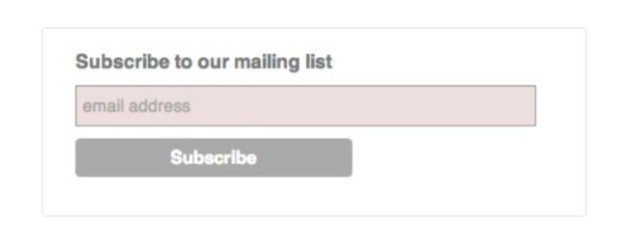
Adding an Inline Signup
An inline signup form enables you to collect subscriber emails, without disrupting the User Experience (UX). To begin the process, go to Lists > Signup forms > Embedded forms within MailChimp.
You have four Design options when creating your inline signup form: Classic, Super Slim, Horizontal, and Naked. Horizontal is a good choice, as it takes up little space. However, you can choose any style that you feel best fits your needs:

Once the form is customized to your liking, click Generate Code. Copy it and head back into WordPress. Navigate to a suitable post or page, switch to the Text editor, and paste the code wherever you’d like. Once you click Publish or Update, you’re all set!
Adding a Sidebar Signup
Similarly to adding an inline form, adding a sidebar signup form starts by navigating to Lists > Signup forms > Embedded forms within MailChimp. Choose the Design option you’d like (we recommend Super Slim or Naked):
You can now customize the form, and once complete, copy the Code at the bottom of the page.
Depending on your theme, you may be able to add the code directly to your sidebar using the Customizer. Alternatively, navigate to Appearance > Widgets within WordPress, select the Custom HTML widget, and drag it to the Sidebar column:
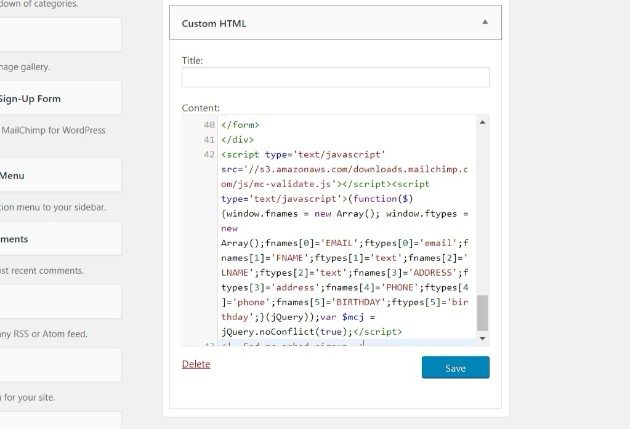
Paste the HTML code directly into the Content field, click Save, and the form should display on your site!
Styling MailChimp Signup Forms
While MailChimp enables you to create a custom style for each signup form, the form will usually inherit your website’s style sheet. This means you may need to make more tweaks down the line.
You have two options: either manually code the changes or use the MailChimp for WordPress plugin.
The latter gives you the ability to create (and add) new signup forms to your website. Using the free version of the plugin, you can create just one form. However, the premium add-on enables you to create multiple forms.
To style your forms, go to MailChimp for WordPress > Form within WordPress. You can make changes to the fields, content, and appearance. Once you save your changes, they’ll be automatically applied to any instances of the form on your website.
Using MailChimp for WordPress
As highlighted above, you can easily add MailChimp signup forms to your WordPress website, which is crucial for building a following.
However, MailChimp can also be used to send newsletters to your subscribers, including automatically. This lets you keep connected with readers in a simplified, hassle-free way.
Setting Up An Automatic Newsletter With MailChimp
An automatic newsletter essentially enables you to instantly email subscribers with any site updates, and the details are sent to everyone on your list.
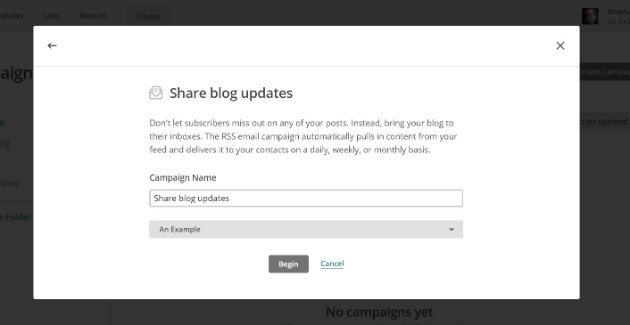
To begin, you’ll need your website’s RSS feed URL. Then go to Campaigns > Create Campaign > Create an Email > Automated within MailChimp. Now, select Share blog posts, name the campaign as you’d like, and click Begin:
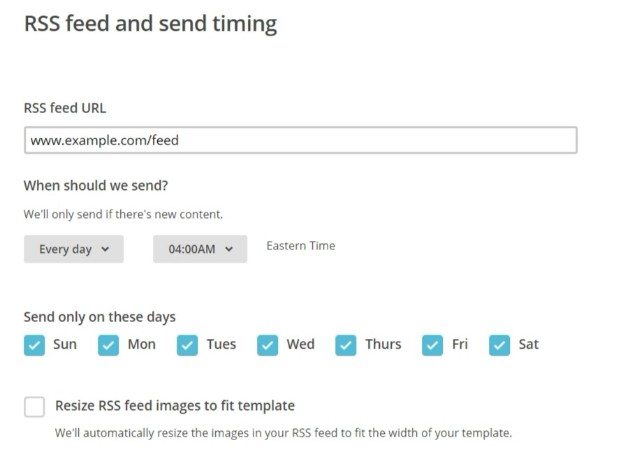
This next step requires you to enter your RSS feed URL, as well as select a send time, among other options:
Select your Recipients, and make any necessary Setup changes (for example, to the Subject field). Finally, select your Template and Design options. Once done, click Confirm and you’re all set!
Whether you’re a blogger, an eCommerce store owner, or a marketer, WP Engine offers a versatile platform to fit your needs. You can create digital experiences that integrate with all forms of marketing, and our 24/7 customer support team is always available to offer expert support.
Are you ready to learn more? Check out our managed hosting plans!