Please note: The content on this page is intended for users on Personal, Professional, and Business Plans. If you are on a Startup, Growth, or Scale plan, learn How to Use Transferable Environments instead.
(Related article: Billing Transfer: Information for Clients)
With WP Engine Billing Transfer, developers can create all their sites directly on a production platform and eliminate the need to manage their clients’ hosting bills. Billing Transfer grants developers two main benefits:
- Using transferable installs, developers can create an unrestricted number of websites directly on the WP Engine platform at no additional charge, no matter which plan they’re on
- Completed installs can be transferred to a client for ownership and billing purposes, freeing developers from the need to manage hosting bills for their clients
For more information about billing transfer, visit the web page.
What is a transferable install?
On WP Engine, a standard install is what our customers use to create and launch a website. Each website is its own install. Standard installs have a full range of features and functionalities, and the number of installs allowed on your account is determined by your plan type. You can read more about them here.
Transferable installs allow designers and developers to create websites on behalf of their clients and then transfer them to the client when the site is complete.
Transferable installs differ from standard installs in several ways. Transferable installs are:
- Unrestricted and do not count against the number of installs you are allotted based on your plan type
- Automatically password-protected to block traffic, and passwords cannot be removed until the transfer is complete
- Automatically exempt from cache due to password-protection
- Transferable to another WP Engine account
- Available on every plan free of charge
- Ineligible for use with SSL and CDN
When should I create a transferable install versus a standard install?
Although they share much in common, transferable installs have key differences that set them apart from standard installs. They cannot be used with SSL or CDN, and password-protection cannot be removed (which means transferable installs are exempt from cache).
For these reasons, you should create a transferable install when:
- You are developing a site for a third party, and you intend to transfer ownership and the hosting bill to them at a later date
- You are testing something and do not intend for the site to ever go live
Otherwise, if you are creating a website that will remain on your account and you want the ability to remove password protection, you should not create a transferable install.
Creating a transferable install
Once you’ve determined that a transferable install is the right install for your project, setting one up is easy.
To create a transferable install:
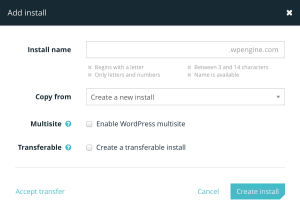
- From your User Portal’s Install page, select “Add install” from the bottom of the left menu
- In the “Add install” window, check the “Transferable” box
- Click “Save”
You can quickly identify the transferable installs on your account by looking for the ![]() icon.
icon.
Transferring an install
When your site is ready for launch, it’s time to transfer it to your client. Transferring ownership means your client will be the primary owner of the site instead of you, and we will bill them directly for their hosting. Your client will have the option of adding you as a user to the install so that you can continue to collaborate on the project if necessary.
To transfer an install to another account:
- From your User Portal’s Install page, select the transferable install from the left menu
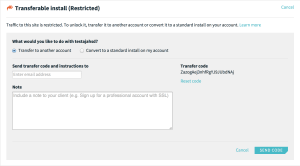
- Click “Unlock this install” at the top of the page
- Click the radio button “Transfer to another account”
- Enter the client’s email address
- You may want to include special instructions to your client; for example, indicating which plan they should sign up for, or reminding them to choose users to maintain site access
- Click “Send code”
We will send your client the transfer code and complete instructions for how to accept a transfer. We will notify you when the transfer has been accepted. Once the client accepts, the install will no longer appear on your account’s install list.
If your client has granted you to permissions on the install, you can access it by changing your dashboard’s view to your client’s account.
Recalling or canceling a transfer
In some cases, you may want to stop a transfer before your client accepts it. To do this, follow these steps:
- From your User Portal’s Install page, select the install from the left menu
- On the transfer screen, click “Reset code”
Selecting “Reset code” will invalidate the code you previously sent, so if a user tries to use it, they’ll receive an error. You can reset the code as many times as you want. You can resend the new code whenever you’re ready.
Converting a transferable install to a standard install
In some cases, you may determine that you don’t want to transfer an install to a client and want to keep it for yourself instead. In this case, you may choose to convert the transferable install to a standard install when it’s time to go live. When the install becomes standard, you’ll be able to add CDN and SSL to the install if you choose.
To convert a transferable install to a standard install:
- From your User Portal’s Install page, select the install from the left menu
- In the upper right corner, click “Unlock this install”
- Select the radio button “Convert to standard install on my account”
- Click “Submit”
The install is now part of your standard installs, and you may now remove the password protection. Remember, the number of standard installs you are allowed is determined by your plan type.
Converting a standard install to a transferable install
In some cases, you may want to transfer an install that is not directly transferable. To do this, you’ll need to use Copy Install.
- Log in to your User Portal
- From the Installs tab, click “Copy Install” from the left menu
- From the drop down menu, select the install you wish to transfer
- Under Install Name, give your install a unique name
- Check the box “Create a transferable install”
- Click “Next”
- Review the details of your install, then click “Confirm Copy”. We will send you an email when the copy is complete.
Some important things to note:
- SSL certificates will not transfer. You will need to purchase a new SSL certificate once the transfer is complete.
- You will need to update the DNS entry after the transfer is complete.
- You can enable CDN on the new install after the transfer is complete.
Accepting a transfer
Check out our article Billing Transfer for Clients: Accepting a Transfer for complete information.
Helping clients be successful
In order to make the transition as smooth as possible, you may want to provide some guidance during the transfer process. Below are a few tips to help your clients complete the transfer seamlessly.
- Inform your client ahead of time that you are about to transfer the install to reduce confusion
- When transferring the install to a client new to WP Engine, be sure to include a message indicating the plan type they should sign up for and any add-ons they may need (such as SSL or CDN)
- If your client loses the transfer code, you can resend it. The install’s overview screen lists the transfer code for your convenience. Alternatively, if for some reason you need to cancel the transfer, you can reset the code on this screen, described above.
- If your client runs into any snags at all, remind them they can always reach out to our support team, and we will be happy to get them up and running in no time
FAQ
| Q | How many transferable installs can I have on my account at a time? |
| A | You may have as many transferable installs as you want on your account, regardless of which plan you are on. |
| Q | Can I transfer an install if I’ve converted it to standard? |
| A | No. Only installs that are in a transferable state can be transferred. |
| Q | How do I change the password on my transferable install? |
| A | On the Install tab of the User Portal, click “Utilities” in the left menu. In the box titled “Password Protected”, click the pencil icon next to your current password. Change it, and click Save. |
| Q | Can a user be added to an install after the transfer is complete? |
| A | Yes. You can add a user to an install in your user portal. |
| Q | Can I transfer an install to a non-WP Engine customer? |
| A | Users who do not have a WP Engine account will be prompted to create one in order to accept the transfer. We cannot transfer an install to another hosting provider. |
| Q | How do I know my client has accepted the transfer? |
| A | You will receive an email notification when the client has accepted the transfer. You will also notice that the install no longer appears on your dashboard in your list of installs. |
| Q | How do I get to the other installs that I have permission to access? |
| A | You can change your dashboard’s view by clicking your account name in the drop-down menu across the top of your User Portal. Click the account where the install is located. You will now see a list of the installs on that account that you have access to. |

