If you purchased your domain through Amazon Route53, the steps in this article will help you configure DNS settings for WP Engine. This step is required in order to go live with your domain on the WP Engine platform.
Please note: Before taking these steps, be sure to add your domain in User Portal.
Step 1: Locate your DNS information in User Portal
First, login to your WP Engine User Portal to locate the information needed to configure DNS. You will find this information on the Overview page for your WP Engine environment. Locate the IP address and CNAME on this page.
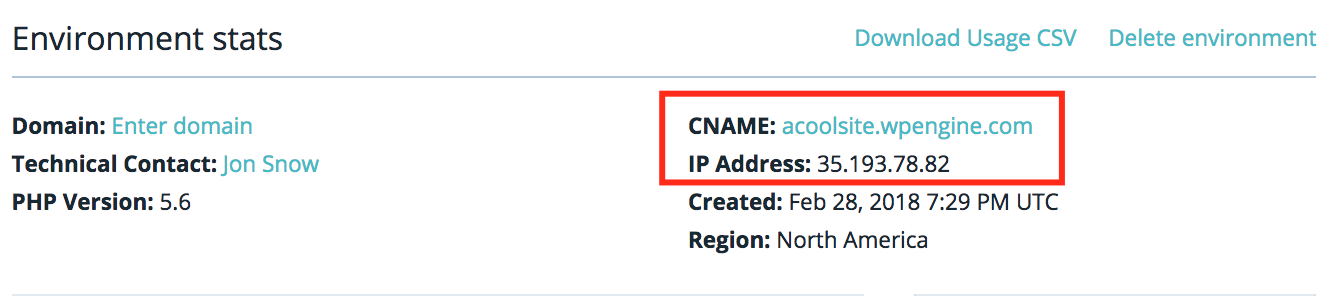
Make a note of these settings, and leave this tab open as you continue through the following steps for easy copying!
Step 2: Login to Amazon Route53
Now, login to your Route53 dashboard at console.aws.amazon.com/route53/. You will be able to manage your DNS zones from the Hosted zones section from the left-hand navigation.
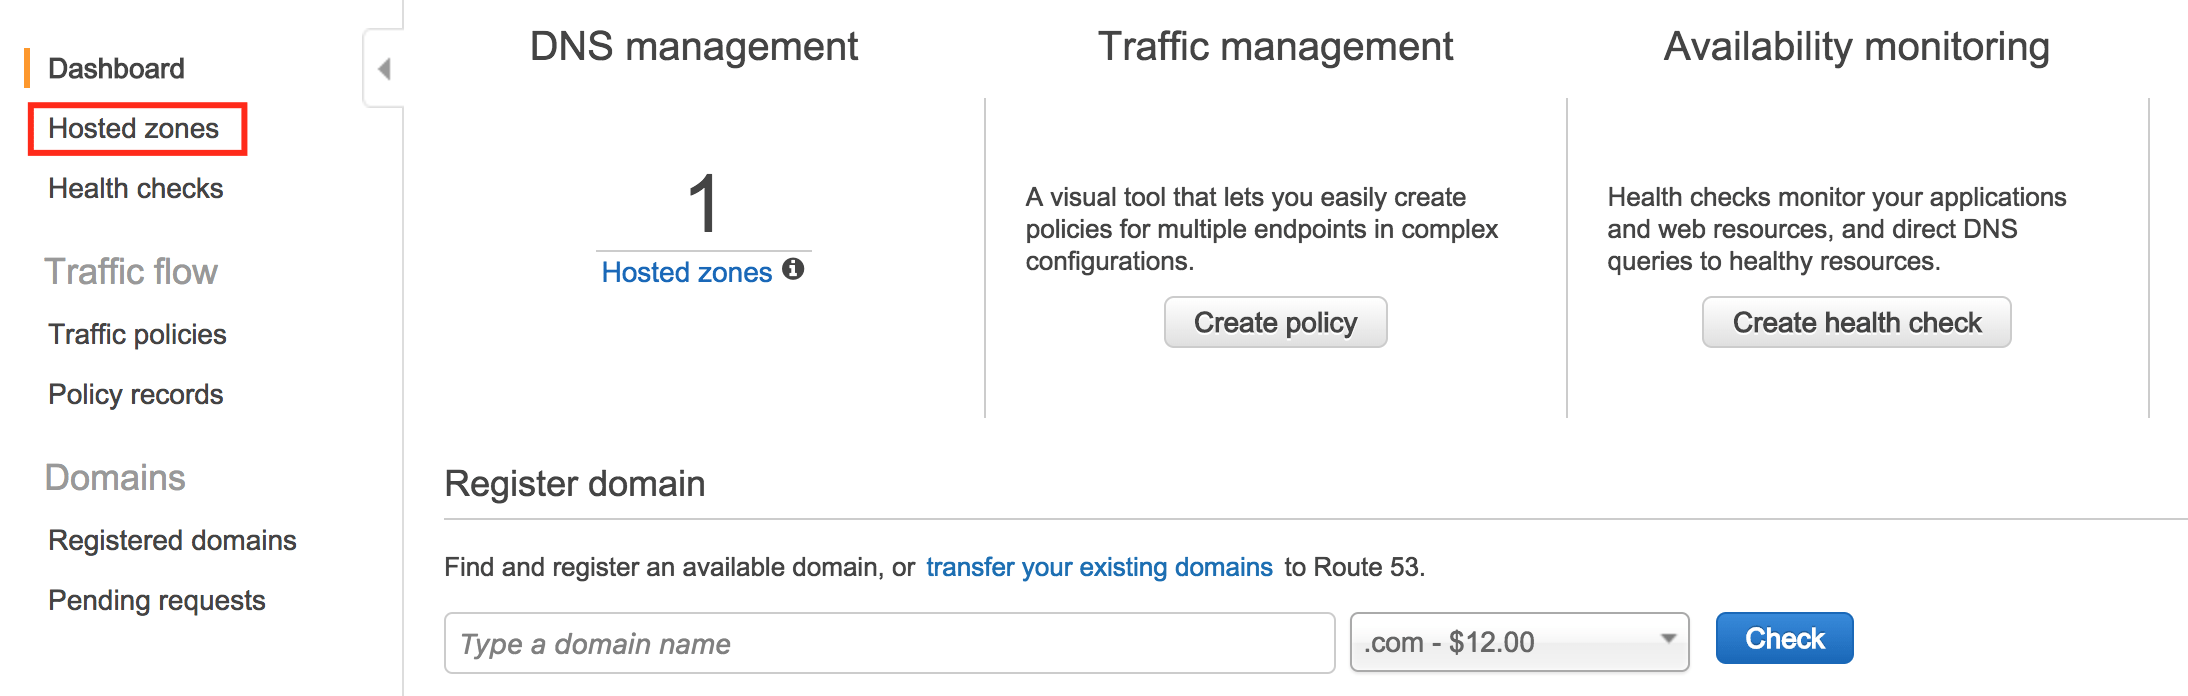
From this page, you will be able to add, edit, and configure DNS records for your domain.
Step 3: Update DNS Records
Now it is time to plug in the settings from the WP Engine Overview page into your Amazon Route53 settings. Before doing this, it’s time to make a choice:
- Option A (preferred): point your nameservers to Cloudflare. This will make it so you never need to update DNS again!
- Option B (still okay!): point your A record to WP Engine. This will work just fine, but you will need to update your DNS records if your website is ever migrated to a new server. This method keeps your Domain and DNS management at Amazon Route53.
Option A: Point Nameservers to Cloudflare
Cloudflare is a service that helps manage your DNS, as well as offering several security benefits. You can configure CDN, SSL, filter users, and even enable DDoS protection on some Cloudflare plans. Before continuing, open a new tab and navigate to www.cloudflare.com. Here you can sign up for a new plan with Cloudflare. There are many plan levels, but for the purposes of this article we will show how to use the free plan.
After signing up, enter your domain name when prompted. Cloudflare will then look up your DNS records and mirror them. In the meantime, select your Cloudflare plan (we selected free):

After selecting your plan, Cloudflare will display your Amazon Route53 DNS records. Remove the A record for your root domain, then configure a CNAME record for it instead.
If your “www” record on this page is set to be a CNAME alias of your root domain, or of your WP Engine CNAME, no further steps are needed. If not, you will need to perform the steps above for the “www” record as well.
When you continue, you will be prompted to change your nameservers with Amazon Route53. This step is performed in the Amazon Route53 dashboard. Leave the Cloudflare page open for easy copying of the new nameservers.
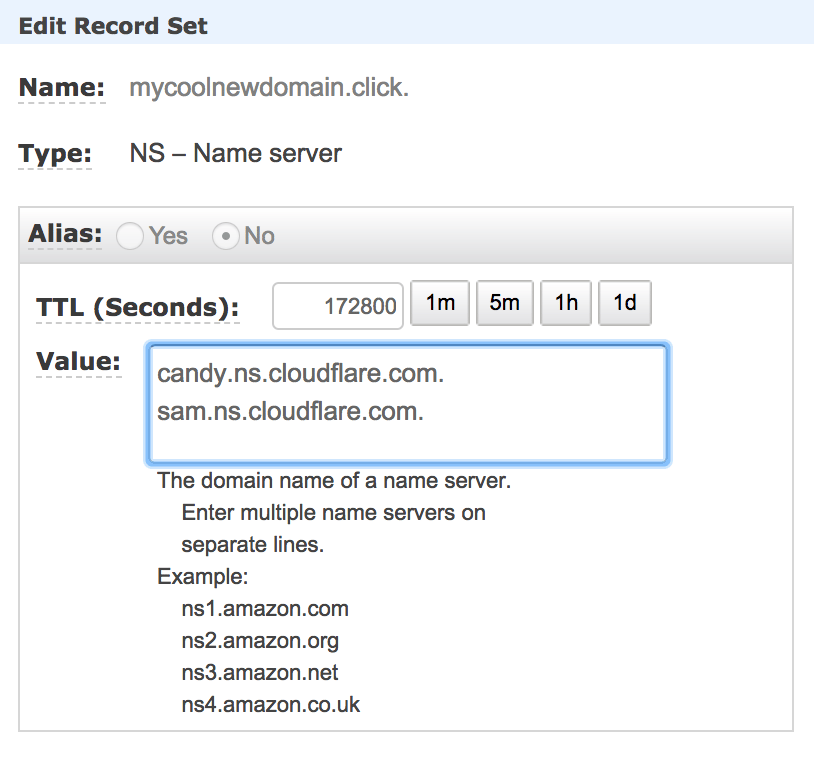
In your Amazon Route53 settings, select the nameserver settings (this will be the record with “NS” in the Type column). In the pane at the right, replace the existing nameservers with the one from the Cloudflare dashboard instead. The nameservers can take some time to fully switch over, but once the change is fully in effect your Cloudflare settings will kick in to direct your traffic to WP Engine! To learn more about Cloudflare’s other services like CDN and SSL, head to Cloudflare Best Practices.
Option B: Point Your A Record to WP Engine
If you prefer to go without Cloudflare, that’s okay! You can configure the DNS settings needed right in the Amazon Route53 dashboard. However, keep in mind that you will need to update your DNS if your website is ever migrated to a new server.
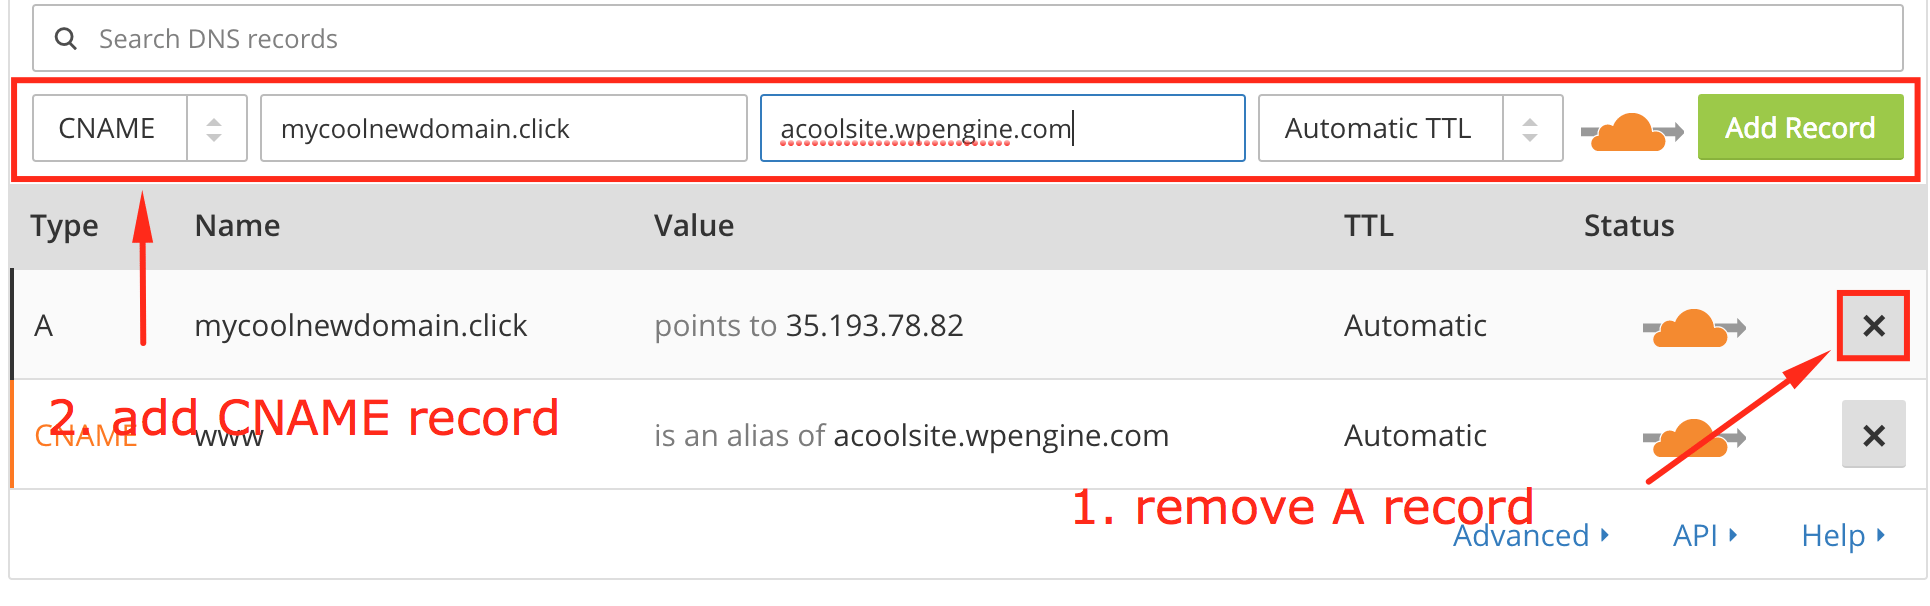
On the Amazon Route53 dashboard, click Hosted zones from the left-hand navigation and select your domain from the list. Here you will see a list of existing records. If you see any existing records with “A” and/or “CNAME” types in the list, you will want to edit these records. Otherwise you will need to add new records.
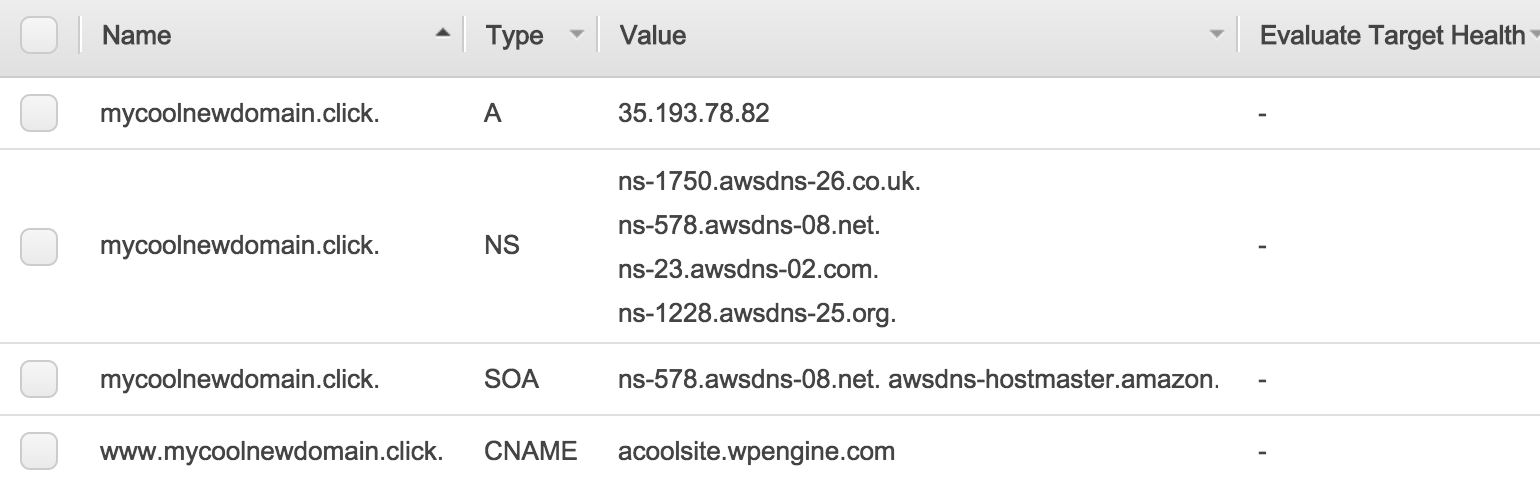
In the example above, an A record and CNAME record exist–these records will need to be edited to match the IP address and CNAME showing on the Overview page in your User Portal.
Start with your root domain, making an A record for it. Leave the “Name” field blank, and select “A record” from the dropdown menu. Last, in the Value field, enter the IP Address from the Overview page in User Portal.
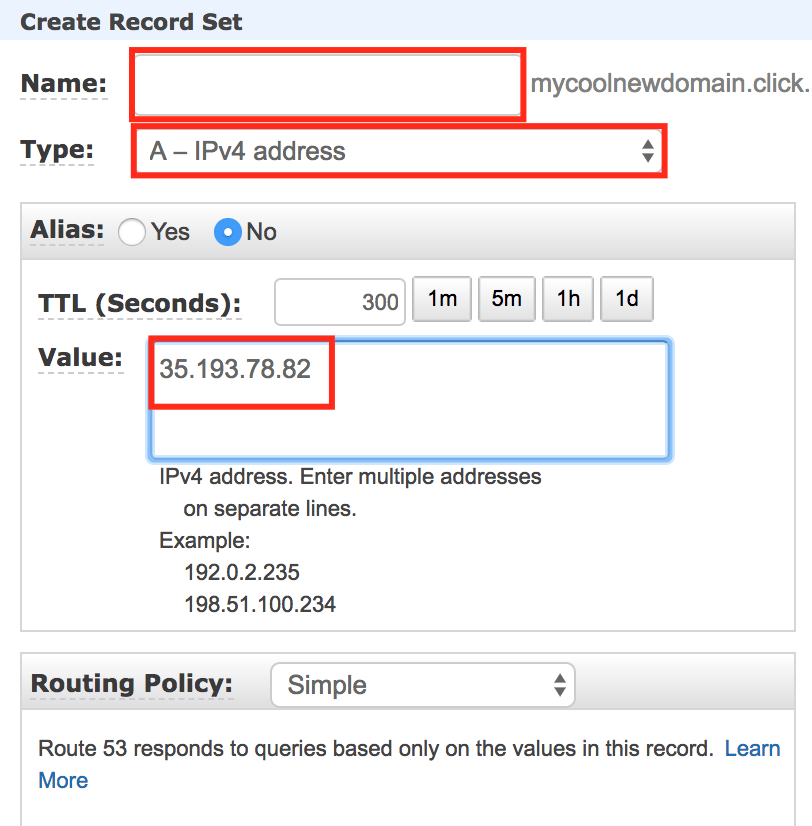
At this stage you can also edit the TTL, or time for your changes to take effect. 300 seconds, or 5 minutes, is the default which usually works for most users. If you prefer, you may adjust this up or down. Last, save the record to ensure your changes take effect.
Now, create or edit the CNAME record. For name, enter “www” in the box and ensure “CNAME record” is selected from the dropdown menu. In the “Value” field, enter your WP Engine CNAME from the Overview page.
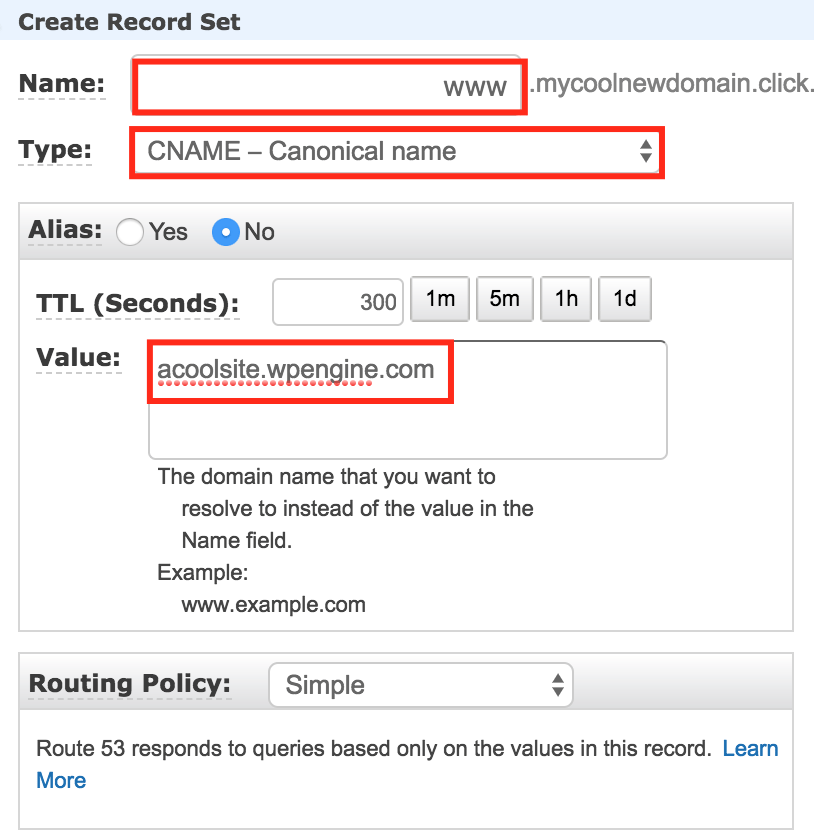
Feel free to adjust TTL for this record at this stage as well, before saving your changes.
Now all that is left is to wait for propagation of your changes! In the meantime, feel free to take this time to review our Going Live guide and ensure you have taken all the steps.