After you’ve migrated your website content to your WP Engine environment at [environment].wpengine.com and you’re ready to go live with your custom domain, there are a few steps to take to now migrate your website domain to WP Engine.
Add Domain in User Portal
Log into the User Portal, navigate to Installs in the top bar (or “Sites” if you are on a Startup, Growth, or Scale plan), and click on the environment name to which you want to associate the domain name.
Please note: A custom domain can only be mapped to your production environment.
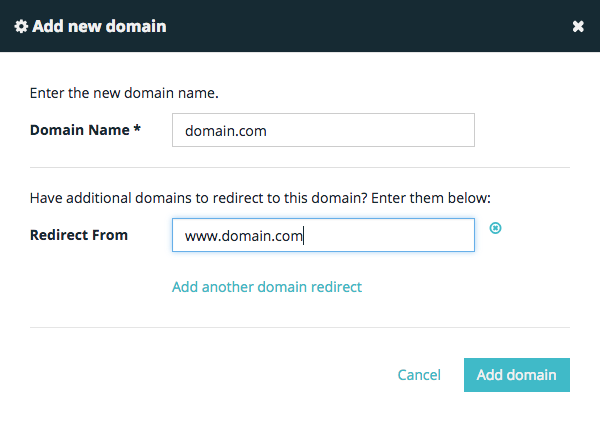
Now click “Domains” from the menu at the left, and click “Add New Domain” to add the domain name to your site’s configuration. Be sure to add both your root domain (domain.com) and the www version of your domain (www.domain.com) to the domains list.
You can also choose to add a domain as a redirect to your domain. If you’d like the www version of your domain to redirect to the root version, just enter it in the “Redirect From” section:
The [environment].wpengine.com domain cannot be removed from your site. However, if you want to redirect your [environment].wpengine.com domain to your live domain, you can do this by clicking “edit” next to the [environment].wpengine.com domain in your Domains List.
Note: If you choose to redirect your [environment].wpengine.com domain to another domain, be sure you check your WordPress Site Address in your WordPress Admin Dashboard to be sure this domain is not set as your primary domain here first! Otherwise, this redirect will cause you to not be able to log in for the next step.
Update Site Address in WordPress Admin Dashboard
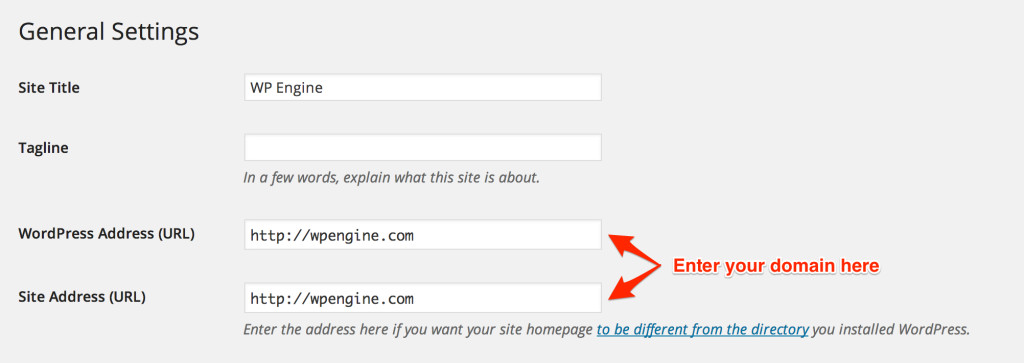
Next, log into the WordPress Admin Dashboard (domain.com/wp-admin/), and go to Settings > General and update the WordPress Address and Site Address URLs. 
Note: Updating these fields will automatically log you out of the WordPress Admin Dashboard, as the domain has now been changed. Don’t worry, this is expected behavior!
Update DNS Records
Now you can update your domain’s DNS records to point the domain to our servers. Before committing the live DNS change, it’s highly advised that you emulate the DNS change using the hosts file trick outlined in our article Emulate DNS change with the hosts file trick. Doing this will allow you to test the website pretending the DNS has already been updated, without risking downtime to the live website. Once you’re ready to point the domain to our server, complete the DNS change as outlined in the article Configuring DNS for WP Engine – and once the DNS change has propagated, you’ll be able to view your site from your custom domain!


