Exporting Your Database
OVERVIEW:
This guide will take you through the process of exporting your database from your previous host, so that you can then migrate it to WP Engine.
Your WordPress database contains all of your website’s content—including things like posts, pages, and categories.
Most other web hosting companies offer the cPanel (a Unix based web hosting control panel) for managing your website. Because of this, we’ll use the cPanel in this guide.
Steps Overview
The process to export your database contains 4 key steps, which we will explain in more detail in the sections below.
- Locate and access your database on your current host.
- Select your database.
- Configure your custom export.
- Export and save the database locally.
1. EXPORTING YOUR DATABASE ON YOUR CURRENT HOST:
The most common way to access your database is by using a tool called phpMyAdmin (phpMyAdmin is a software tool that handles the administration of MySQL over the web).
Log into your cPanel (please contact your previous host for assistance if you need it) and click on the icon called phpMyAdmin. This will open up an application used to manipulate and manage your database.
Note: The images below are from the most current version of phpMyAdmin. Older versions may have a slightly different setup.
2. SELECT YOUR DATABASE:
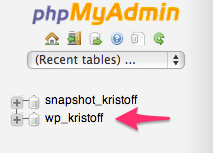
You will see a vertical list of databases on the left side of your window. Click on the database for the website you are planning to migrate.
In the example below, the database used by the website we want to migrate is called wp_kristoff.
If you don’t know the name of the database, we suggest you contact your current host to ask for help.
3. CONFIGURE YOUR CUSTOM EXPORT:
Once you have selected the correct database, click on Export in the top navigation menu.
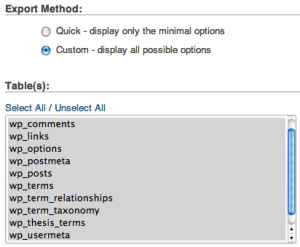
Next, you will be provided with options for the Export Method. Select Custom. This will show additional export options.
Note: Older versions of phpMyAdmin may not have an “Export Method” and will default straight to “Custom,” which is just fine.
From the Tables box, click Select All to ensure that all of the tables are exported.
Scroll further down the options list to the Format heading. Then pick SQL as the export format.
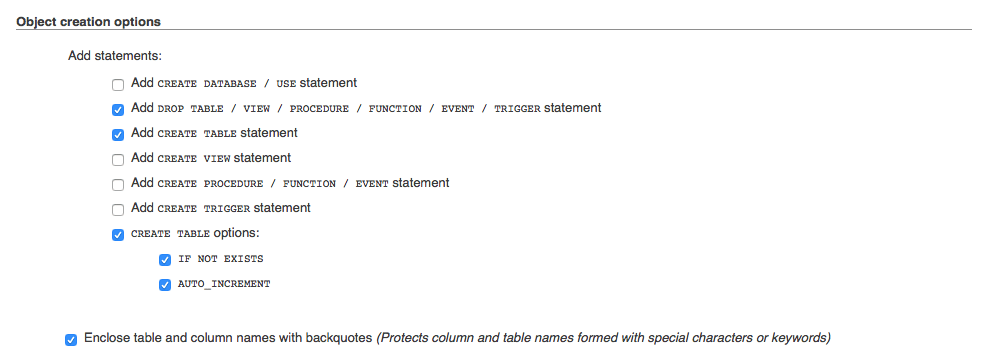
In the Object Creation Options subsection, select the following check boxes:
- Add DROP TABLE / VIEW / PROCEDURE / FUNCTION / EVENT statement
- CREATE TABLE statement
- CREATE TABLE Options
- IF NOT EXISTS
- AUTO_INCREMENT
- Enclose table and field names with backquotes

The final piece to consider is Maximal Length of Created Query, which is found at the bottom of the Export page. For databases over 300MBs we highly recommend you alter the Maximal Length of Created Query to 1047551.
All of the other export options may be left as you found them, on their default settings.
4. EXPORTING YOUR DATABASE AND SAVING LOCALLY:
Next, click on the Go button at the bottom of the page. The database export will now save to your computer with a .SQL extension (e.g. wp_kristoff (1).sql in the screenshot below).
The exported file will typically be downloaded to your /Downloads folder. The location of this folder may differ, depending on your browser and operating system.
You have now successfully exported your WordPress database from your current site!


