The most powerful feature of WordPress Multisite is the ability to have multiple sites under one parent WordPress environment. This tutorial will help you add new sites to your WordPress Multisite environment and map a custom domain to the new site.
Please note: WordPress Multisite is available as an add-on for Startup, Growth, and Scale plans, and included for Professional, Business, Premium, and Enterprise plans.
Create Your Subsite
The first step is to add your new domain to the User Portal. For more information on how to do this, please visit Add Domain in User Portal. If you’re using a subdomain, and plan to use several more, our support staff can enable domain wildcarding for your account, which will prevent the need to add each subdomain to the domains list.
Once you have added the new domain to your User Portal, you will now need to create the subsite for it within your WordPress Multisite website. To do this, please follow these instructions:
- Navigate to My Sites > Sites. (/wp-admin/network/sites.php)
- Click Add New at the top.

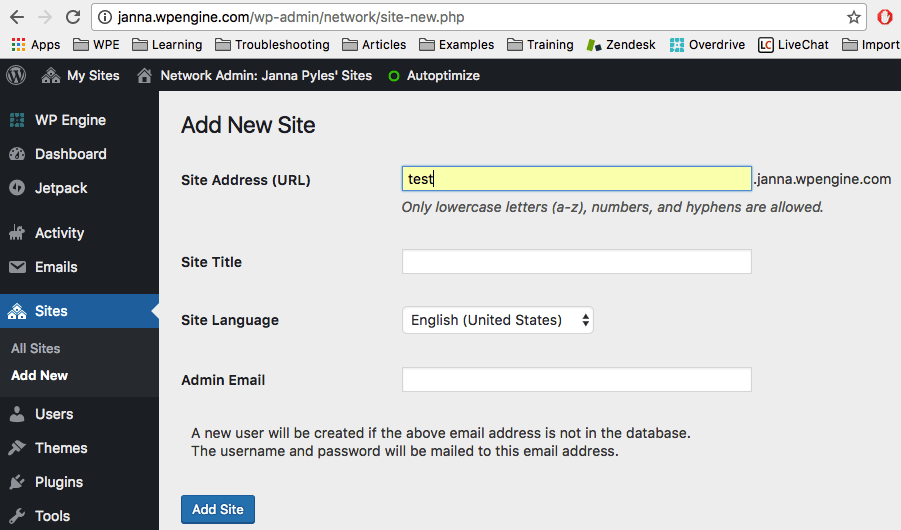
You’ll be taken to this screen. You will see three fields:
- Site Address
- Site Title
- Admin Email
Choose Your Subsite Address & Info
For Site Address, choose one word. Do *not* choose something like www.domain.com, because then it becomes www.domain.com.domain.com. A good input example would be dev or subsite2.
Some rules for site addresses:
- With subdomain Multisites, your subsites are named something.yourdomain.com. Your subsite in subdomain Multisite can be named anything as long as it’s a single word, but we do not recommend naming it “www.”
- With subdirectory Multisites, your subsites are named yourdomain.com/something. WordPress has a list of reserved subdirectory names: page, comment, blog, files, feed, wp-admin, wp-content, wp-includes, wp-json, embed. These names are reserved because they are already used in WordPress by default.
Site Title will be the new title of the subsite. This can be anything you would like and can be changed later.
Admin Email can be yours or the email address of your client. Whomever’s email is placed here will have access to the dashboard of the newly created subsite.

You have successfully created a subsite on your Multisite environment.
Mapping a custom domain to your subsite
Mapping a domain to your subsite allows you to use a different custom domain to access a subsite on your Multisite network. For example, something.domain.com can be accessed as something.com.
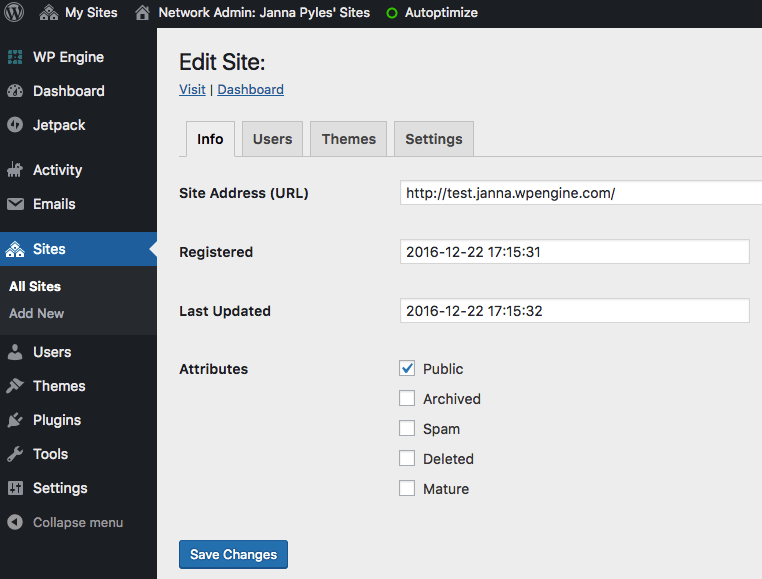
In WordPress 4.5, Native Domain Mapping was added to WordPress core. This removes the need for a plugin to map your custom domains to a subsite. This will be done from the network admin Sites section (/wp-admin/network/sites.php). In order to map the custom domain to a subsite, all you need to do is click Edit on the site you wish to update and change the Site Address (URL) under the Info tab. You’ll change this from the subsite address you set up in the last step, to your new domain (e.g. change http://something.domain.com/ to http://mynewdomain.com/).
Tip: Don’t forget to include http/https at the beginning of the Site Address field! (e.g. http://mydomain.com)
For customers who are already using the WordPress MU Domain Mapping Plugin, it is possible to switch to using Native Domain Mapping. But there is currently no benefit or reason to do so. We’re working on a process to help customers switch from the domain mapping plugin to WordPress native mapping. If you have any questions, feel free to reach out to our support team. We are available 24/7 via Live Chat in your User Portal.