Please note: If you are on a Startup, Scale, or Growth plan, you have Staging and Development environments to use instead. Learn how Staging and Development environments work on these plans.
One of the benefits of WordPress hosting through WP Engine is the ability to set up a 1-click staging site from your WordPress Admin Dashboard. A 1-click staging site is an independent clone of your live production site that can be easily created to test plugins, themes, and custom code. You can also copy the 1-click staging site back to the live site at any time after making changes. Each WordPress install at WP Engine can have its own staging site.
There are a few best practices to keep in mind when working with 1-click staging sites:
- There is no server side caching in place on staging sites, so ensure anything that could conflict with the cache is tested Live as well
- Backups for Staging are enabled and work exactly like our Live backups, you can read more about them here
- Only the current year’s /uploads and /blogs.dir directories are copied. However, our system will look at the live site to find an image if the staging site does not have a particular image copied over.
- There are some plugins that should not be used in the staging area. For example, plugins with automation around tweeting or posting are not ideal to use in staging.
- If you have mapped a custom domain to your production area, be sure to redirect the [environment].wpengine.com URL to that custom domain on the Domains page in User Portal. This will ensure the proper domain is used when copying from 1-Click Staging to your live website.
Plugins that may have issues in the staging area are generally connected to third-party services or validate licenses through their domain. In this case, you may need to purchase two licenses to ensure similar functionality between your live and staging sites, or add the [installname].staging.wpengine.com domain to the license. You can also contact the author of your plugins for more information.
How to create a 1-click staging site
To create a 1-click staging environment, follow these steps:
- Go to your WordPress Dashboard (yourdomain.com/wp-admin or [environment].wpengine.com/wp-admin).
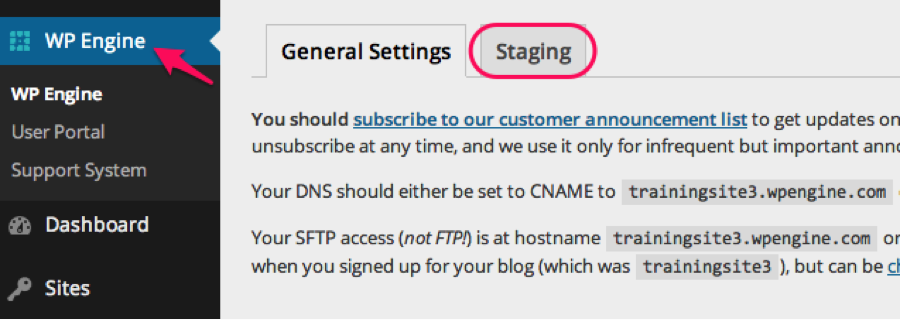
- Click on the WP Engine logo on the side bar located at the top left corner.
- Select the “Staging” tab
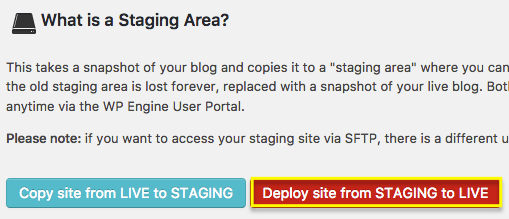
- Click “Copy site from LIVE to STAGING.”
Your site will now be copied to the staging area and a green box will pop-up showing the status of the task. Please note that the duration of this process will depend on the size of your site. The larger the site, the longer it will take to copy.
When your live site has been copied into the 1-click staging environment, you will be given a link to access it. It appears as follows:

Note:
If you already have a staging area, clicking the “Copy site from LIVE to STAGING” button will overwrite it. Please be very careful when copying to staging.
The URL structure for every staging area appears as follow: http://[environment].staging.wpengine.com
You can access the 1-click staging management area by simply logging into the wp-admin for your live site, i.e.: http://[environment].wpengine.com/wp-admin/
All existing users and user meta information will be copied from live to staging and all website users can log into the staging site with the same credentials used in the live site.
The 1-click staging area is not indexed by search engines. The robots.txt file is set to “disallow all” user-agents (bots) for the 1-click staging area.
Access the 1-click staging site’s database
You can access to the staging site database in the same way that you access the live site’s database. In the User Portal, click phpMyAdmin for the proper environment. Then, once inside phpMyAdmin, select the database labeled “snapshot_environment”. This is your staging database.
Note: The database “wp_environment” is the database for the live site. Any changes you make to this database will affect the live site.
Please read Accessing your database for additional information on accessing your database.
Access the staging site’s file system
To access your staging site’s files via SFTP, read How Do I Add a New SFTP Account. When creating the new SFTP account, be sure to set the “Environment” to “Staging.” If you are on a Startup, Growth, or Scale plan, this may be labeled as “Legacy Staging” for you. Learn more about how the staging environments on these accounts differ.
You can also edit any existing SFTP user’s settings and change the “Environment” to “Staging” (or “Legacy Staging” if on a Startup, Growth, or Scale plan). For additional information on logging in via SFTP, please see Accessing SFTP.
Copying the staging site to your live site
If you’ve made changes to the staging site and want to push those changes to the live site, you can do so with the click of a few buttons.
Please Note: When pushing changes from 1-click staging to live, the file system from staging does not overwrite the live file system but instead merges with the live file system. This means any updated files in staging will be updated on live after a push, but any deleted files in staging would not be deleted in live.
After logging into your live site’s /wp-admin click the WP Engine button on the top left hand side. Then, click the “Staging” tab.
You will now see a red button labeled “Deploy site from STAGING to LIVE”. Click that button. It appears as follows:

Then, you will be prompted with a dropdown menu that appears as follows:
This dropdown menu will allow you to select all, none, or specific database tables from the staging area to the live site. If you select all tables, any new posts, pages or users changes made to the live site during your work in the staging area will be overwritten.
To push all changes except for pages, posts and users to your live site, select all database tables except wp_posts, wp_postmeta, wp_users and wp_usermeta. If you push no database tables, only changes to theme files, core WordPress files and plugin files will be pushed to the live site.
This covers the essential functions of the staging site. If you need any additional support, please check our Support Garage for relevant articles or contact our Support team via 24/7 Live Chat in your User Portal.


